
Table of Contents
Epoxy Resin Ocean Wave Tutorial with your NZ Epoxy Resin Guru Paul Morris #paulmorrisepoxyguru. Crafting waves in resin art is a lot of fun, but it can almost be near impossible if you do not have the correct type of resin combined with the proper technique for perfect results. Here, I will show you how to get perfect results in this Ocean Wave Tutorial every single time with the best resins for lacing/wave creation. There are many Ocean Wave Tutorial videos around now, and it is good to watch other people's techniques as that is how we broaden our horizons, becoming true masters of Passionart resin wave creations.
Firstly, you need a perfectly designed resin to create that beautiful lacing effect, which gives the appearance we expect from ocean wave formation. Now, there are a couple of excellent resins to use, bulleted below with other attributes, that we guarantee will give you that perfect wave effect if you follow our guidelines and video tutorials.
Top Wave Formation Resins
- PassionArt 1:1 Art Craft ResinThe PassionArt Craft resin is a 1:1 art craft resin designed by Resinzwood / Passionart company with the highest UV additives possible for New Zealand's harsh sun conditions. This resin works for 25 to 35 minutes at a room temperature of 21 to 23 degrees Celsius. For its versatility, this is one of our modified imported resins raved about by resin artists across Aotearoa, New Zealand.
- Colour Passion Fast Cureresin has a very short working time in warmer places like parts of Australia and the Pacific Islands. Here in NZ, you get 15 to 20 minutes before the resin is unworkable. The benefit of using a fast-cure resin is that you can produce artistic pieces that cure within a 3-hour. Kym will be doing some video tutorials on this product in the coming months.
- PassionArt 2:1is a slower-curing resin with a working time of 30 to 40 minutes at 21c to 25c room temperature. Once again, this is one of the Resinzwood custom-designed resins, for New Zealand's conditions with a high UV additive that we make here in New Zealand.
What Resin Should I Use?
In this Ocean Wave Tutorial, we have given you a list of the best resins to create the perfect lacing and wave effects. However, it comes down to user preference. Some people love the 1:1 PassionArt Lacing Kit - Perfect Waves, as this is discounted, getting precisely what you need at once. Some people like the Colour Passion resins, while others prefer the 2:1 ratio by weight resin. You need to try each product and see which works best for you. Please share your thoughts below on what resins you find from our range best for wave-making. You may get a free Top Cell white for your participation.
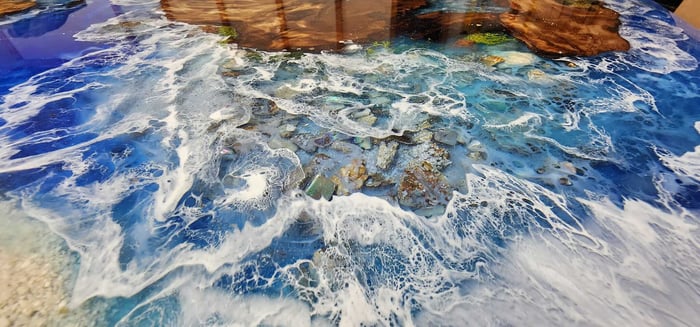
White Paste To Craft The Perfect Waves
To craft the perfect waves, you must have the best resin and the highest-quality titanium-enriched white paste to create the effect. Resinzwood has found that the Colour Passion Top Cell White is the best product in the global market thus far. We recommend purchasing one of our Ocean Kits from the Colour Passion range of kit sets, as this is the most cost-effective for crafting your amazing waves with Resin Wood Tables NZ.
Best Ocean Kits Here
Step by Step Ocean Wave Tutorial with Karen Stevenson
- Preheat your Passionart 1:1 Art Craft Resin in the containers by placing them into a bucket of hot tap water for 20 mins.
- Use the resin calculator to get your volume correct based on a pour of 3mm.
- Add your Part B Hardener to the container first, then add your Part A Resin. You want to ensure that all of Part A comes into contact with Part B. If you do not do this, you can end up with sticky, uncured resin in your work once you scrape out your container.
- Mix your resin with a stick in a circular motion, first one way and then the other. Mix slowly so as not to aerate the resin. Make sure you scrape the sides of the container so all the resin is well blended.
- Now subtract a proportion of the resin you will mix with the Top Cell White for the waves. You also want to allow a proportion of clear resin to be used for the Push; this is where the Top Cell white glides on the clear resin.
- Always mix the paste in the container before using, ensuring an even texture.
- Watch the video below to see how minimal Top Cell White is used. Basically, you want to coat both sides of your stick and scrape off all the excess, leaving staining on the stick; now, use this to color your resin for the waves. You will notice that after mixing, your white will become more intense. Remember, you can always add but not subtract the color intensity.
- Karen is using a board that is already colored for demonstration purposes. Still, you can pour your colored resin on the board first for the background before continuing with the next step, as you do not need to wait until that layer of color has been set.
- Now, leave the white resin for about 10 minutes to thicken while blowing out the other resin with a heat gun on a medium setting. This thins the resin to spread out and pop any micro bubbles.
- Do not let your white wave resin thicken too much; otherwise, it will not blow out as desired.
- Now, use the clear to make a line of resin on the leading edge of the resin on the board.
- Now pour your white resin along the back side of that line of resin. This acts as a slip layer for the wave effect to form when the resin is blown over the ocean. See the Video Below.
- Now that you have poured out the white, heat your resin again using your heat gun at medium temperature.
- Now turn your heat gun to full and blow out the white resin over the top of the ocean colors. You can add more white to repeat the process if the cells are too light in the first attempt. Please do not overwork the blowing, or the waves will become messy.
- Now use a blue flame gas torch over the white wave effect, especially as, over time, the cells will open up.
- Wow, you have created waves for the first time like a pro using our Ocean Wave Tutorial. For more info, call Paul 7 days a week from 7 am till 11 pm on 021966387. Alternatively, Contact Us using our Contact Us form