Table of Contents
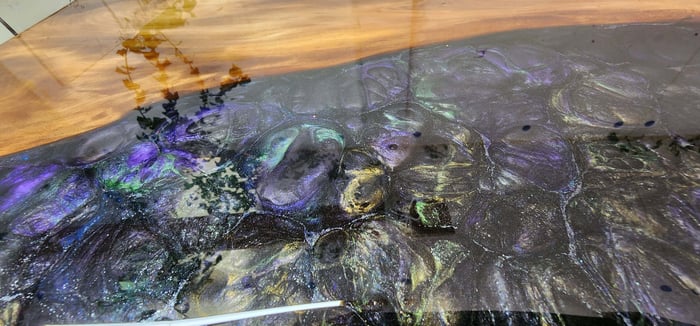
Kia Ora Friends and Whanau, Check out this new DIY Multi-Coloured Cheeseboard tutorial. Inspiration for this tutorial came from a pearly multi-layered space table I crafted for a young lady in Auckland. Learn how to make the ultimate multi-coloured cheeseboards with Resin Wood Tables NZ using the Highest-Quality Resins from Passionart, Resinzwood. Firstly, you need to decide if this will be simplistic layering or blended effects that will be highlighted once you shape your sides, revealing the stunning swirling marble effects. My personal opinion for this DIY Multi-Coloured Cheeseboard is to go for the swirl effect, as single layering only reveals the effect on the top, Colour Passion. Use our products for the best quality finishes at the best prices in New Zealand.
When you are thinking about making a DIY Multi-Coloured Cheeseboard firstly you need to decide if this is going to be simplistic layering or blended effects that will be highlighted once you shape your sides that will reveal the stunning swirling marble effects. My personal opinion is to go for the swirl effect as single layering only reveals the effect on the top leaving the sides with layer lines.
PassionArt Craft Resin
$80.00
$100.00
PassionArt Resin 1:1 by Volume. "With high UV resistance and crystal-clear transparency, PassionArt Craft Resin is the top choice for resin artists in New Zealand. We are committed to continually improving all our products, ensuring you have access to the most… read more
DIY Tutorial Options.
- You can purchase moulds directly from our site as kit sets. These are made from MDF, Form Ply, or professional-graded ones that we will custom-make to the size you want from HDPE. You can now purchase kiln-dried timbers from small pieces up to ten-meter-long Swamp Kauri slabs. Contact Paul on 021966387 for your specific requirements.
- Use this DIY Multi-Coloured Cheeseboard tutorial as a guide then think of your own colours that may include pigment powders, pastes, liquid translucent dyes to create your desired effect. Just remember, by purchasing products from our online store you will also get professional help 7 days a week by contacting us through our Resin Wood Tables NZ Facebook, Email resinwoodtablesnz@gmail.com, or calling Paul 7 days a week from 8 am till 11 pm 021966387 This is our commitment to our loyal customers that we want to see succeed.
DIY Tutorial Guideline
- Purchase a mould or mould kit for your DIY Multi-Coloured Cheeseboard by contacting us with the size you want and advising us if you want an MDF, Plywood, or professional HDPE custom-made mould.
- Purchase our Highest-Quality Resins, such as our Deep Pour Ocean Cast epoxy, Knot Hole resin, Art Resin, or Ultrafast resin. Also, purchase pigments, powders, dyes, glitters, and other fun, creative things you want to use.
- Once you have your mold and timber sorted, make sure you plane and sand it to at least 180 grit. Then seal coat your timber with Resinzwood Multi-Sealer on both the top and bottom of the board before placing it into your mould. This ensures that the amount of air or moisture that can be sucked into the timber is equal avoiding twisting etc. Ensure that your wood pieces are weighted or clamped down in the mould; otherwise, once you pour in the deep-pour resin, the timber will start to float. Now, you are ready to craft your DIY Multi-Coloured Cheeseboard.
- Deciding what resins to use is the key now for your DIY Multi-Coloured Cheeseboard. Generally, I like to use the Ocean Cast epoxy poured up to 35mm deep or within two-thirds of the thickness of the timber, letting that cure until it is thickish and gluggy. Once it is at this stage, you can use your multi-colored resins to swirl and blend into the base layer. Try not to do too much swirling, or this will make your piece look mucky-looking. This will bring the depth up a lot, and you can wait till that is thickish and do another pour of colours to get your desired effect. Okay so what type of resin should I be using for the colours and swirling?
- Resin Options - You could use the Tabletop Resin Ultra Fast resin as this has some pretty kool properties that can make for amazing effects. As the Ultra Fast cures in 4 hours, this will effectively exotherm or flash cure in larger volumes, aiding in the faster curing of the base layer. The danger here is that it may over-exotherm and crack the resin, which is not always bad as it allows you to fill the cracks with other colours, adding to the overall effect.
- Resin Option Art Resin 1:1—This has a curing time of 8 hours but 24 hours until solid. This gives you more time to play with the colour combination until the base layer is too thick or too cured to work with. However, you can add additional layers to create different effects.
- Resin Option Knot Hole Resin—Resinzwood Knot hole resin is 2:1 by weight, as is our other Tabletop Bar Top resin. Both of these will create different outcomes as they have different properties, such as curing times and thickness of pouring, that I always exceed in funky artworks for that desired look.
- Now that we have completed that fun part, it is time to shape your board. I like to really get into it here, carving deep into the sides with bends and twists, exposing the layers. Seeing all the colours pop out is quite mesmerizing. Don't forget to plane and sand both the top and bottom of your board so it is perfectly flat and ready for the final coats. Now that the sanding is done, I personally like to coat my base so it looks perfect and flat. Now, you are ready to place tape on the bottom side to dispose of the drip line from the flood coating on the top.
- Tape the bottom edge. Here, it is a bit of guesswork as you imagine at what point the resin will drip from the underside once gravity takes control. Now that you have visualized that point, run painter's tape around that bottom edge part, ensuring it goes two or three layers thick. This lets you sand off the drips without damaging the beautiful flat underside. Once you have sanded away the drips, you can easily peel off the rest of the tape, leaving a perfect result
- Flood Coating—This is my favourite part, as now you see all your creativity and concepts come to life as you pour on that coat, revealing the amazing piece you have crafted with Resin Wood Tables NZ. To flood coat your board or tabletop, or bar top, make sure you calculate the amount you need with our Resin Calculator. Work on a surface coverage of 4 to 5mm. Use Ultra Fast Resin, as this is the best in NZ for UV rating, durability, and glass finish. My second option would be to use our 2:1 by-weight Tabletop Bar top resin that, unlike Ultra Fast, is made to our specs by a partner company in China. Ensure you brush around the outside edges with a nice thick coat to allow for the slip layer to work.
- Flood Coating—Now pour the majority of the resin through the middle of the board, using your hand to pat the resin out to the outer edges. Then, go around and fill in low areas or hollows. You can also use a brush in the video below. This video is old, but it still gives all the principal facts about crafting your effects boards.
- Competition - Now that your board has been left for 24 to 48 hours in a hot environment it is now really hard to place it upside down on a foam layer or soft blanket while you sand off the drip line and remove the tape. Wipe or polish this edge where the tape was. Flip your board over, and you are finished. With our Resinzwood Ultra Fast resin the top will be perfect if you have followed my guide. No need for any polishing or that sort of stuff that you will find with the overpriced resins from other suppliers.
- Well done! Now that you have completed your DIY Multi-Coloured Cheeseboard share your entire build or finished product on our International resin art page. NZ RESIN ART _ RESIN ART SUPPLIES
